Free 14-Day Access ON TELEGRAM
Part 4: The Elliott Wave Phases That Offer the Clearest Trading Opportunities
One of the most common mistakes traders make when learning Elliott Wave is assuming that every wave should be traded. In practice, this approach leads to overtrading, frustration, and inconsistent results. Elliott Wave becomes far more effective when used selectively. Certain phases consistently offer clearer structure, stronger momentum, and more favourable risk-to-reward conditions than others.

Why Only a Few Waves Deserve Attention
Markets tend to reward participation in the direction of the dominant trend. Waves that move with that larger trend typically travel farther, resolve faster, and provide cleaner invalidation levels.
Across both impulsive and corrective structures, three waves stand out:
Wave 3
Wave 5
Wave C
These waves share a common trait: they advance in the direction of the larger market pressure rather than against it.
Trading With Momentum Instead of Against It
Trading in alignment with the prevailing trend improves probability. In rising markets, upward-moving waves tend to be stronger and more persistent. In declining markets, downward-moving waves often unfold with similar clarity.
Elliott Wave helps identify where price sits within this broader context, allowing traders to focus on participation rather than prediction.
Setup Phases vs Expansion Phases
Not all waves are designed to be traded directly. Some exist primarily to set up the next opportunity.
In an impulse structure:
Wave 2 is a pullback that sets up wave 3
Wave 4 is a pause that prepares wave 5
In corrective structures:
Wave B often provides the setup for wave C
These setup waves are valuable for context, but the expansion waves that follow tend to offer clearer execution conditions.
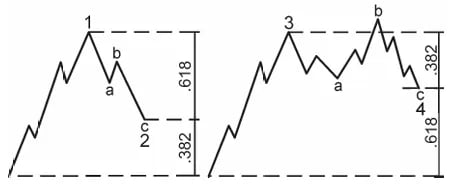
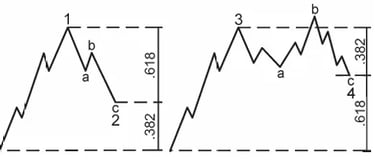
Why Waves 3 and 5 Matter Most
Wave 3 is often the strongest and most directional phase of an impulse. It reflects broad participation and sustained momentum once the trend is established.
Wave 5 represents the final expansion of that trend and is the easiest one to spot due to the impulsive nature of Wave 3. While it may not always match wave 3 in strength, it often completes the broader move and transitions the market into a new phase.
Both waves typically move decisively and offer clearer invalidation levels than corrective phases.
Why Wave C is the Only Correction Worth Trading
Corrections can be complex, overlapping, and emotionally taxing. Most corrective phases consume time rather than produce meaningful price movement.
Wave C is the exception:
It moves in the direction of the higher-degree correction
It often unfolds with momentum rather than hesitation
It tends to resolve more cleanly than internal corrective legs
This makes them structurally clearer than sideways or overlapping phases.
Why Most Corrections Are Better Observed Than Traded
Internal corrections such as flats, triangles, and combinations often:
Lack directional clarity
Produce false breakouts
Require extended patience
Attempting to trade these phases frequently leads to overtrading and reduced discipline. Elliott Wave is most effective when used to avoid low-quality environments, not just to find entries.
When Trading Corrections Can Make Sense
Context matters.
On higher timeframes, corrective waves may span days or weeks, creating opportunities that align with a trader’s holding period. On very short timeframes, those same corrective structures may be too brief and erratic to trade effectively.
Matching wave degree to trading timeframe is essential.
Building a Sustainable Trading Edge
Elliott Wave provides more than pattern recognition. It offers:
Historical context
A framework for expectation
Clear invalidation levels
Used selectively, it helps traders filter opportunities rather than chase movement.
How This Lesson Fits the Series
This lesson explains which waves deserve focus and which should usually be avoided. It sets the foundation for understanding why momentum sometimes concentrates in specific phases.
The next lesson builds on this idea by explaining extensions and truncations, showing how momentum can accelerate dramatically — or fade unexpectedly — within these key waves.
Elliott Wave Trading Course Series
This article is part of the Elliott Wave Trading Course.
Lessons in this series:
Part 2: The Simple Market Structure That Explains Every Price Move
Part 3: Why Elliott Wave Provides More Context Than Traditional Indicators
Part 4: The Elliott Wave Phases That Offer the Clearest Trading Opportunities
Part 7: Corrective Wave Structures and Fibonacci Relationships in Elliott Wave
Part 8: Applying Elliott Wave Structure with Confirmation-Based Trade Execution
Part 9: Risk Management and Psychology
Disclaimer:
Trading forex involves significant risk and may not be suitable for all investors. Past performance is not indicative of future results. The information and signals provided on this website are for educational purposes only and should not be considered financial advice. You are solely responsible for your trading decisions and any resulting financial losses. Please consult with a licensed financial advisor before engaging in forex trading.
© 2026. All rights reserved.
Trading Resources: [Market Insights] [Elliott Wave Course] [Forex Signals Guide] Tools: [Economic Calendar ][Position Size Calculator] Support: [FAQ] [Contact] [New To Telegram?]